> For the complete documentation index, see [llms.txt](https://ocguide.eyw015.com/llms.txt). Markdown versions of documentation pages are available by appending `.md` to page URLs; this page is available as [Markdown](https://ocguide.eyw015.com/quest-guide/udp-hotspot.md).
# Quest激活-电脑热点
此方案需使用电脑的**无线网卡**,如台式机没有无线网卡,**就去买一个USB WIFI**,如果**不支持开启系统原生热点**,可以使用网上搜索的免费热点软件进行共享
{% hint style="info" %}
需要**支持UDP转发**,否则网络受限 [Quest网络受限原因](/quest-guide/basic-net.md#udp-ce-shi)
[寻找梯子](/ready/proxy-server.md)
{% endhint %}
***
## Clash TUN模式
对于不遵循系统代理的软件,开启 TUN 模式将在电脑设置一个虚拟网卡,接管其流量并交由 Clash 处理
{% hint style="info" %}
日常上网**系统代理**足够,不需要开启Tun模式,否则容易与游戏加速器等冲突
{% endhint %}
### 安装服务模式
在 [Clash Verge](/quest-guide/clash.md) **设置** 菜单中找到 **服务模式** ,点击 **盾牌图标**** > ****Install**
安装成功后会显示 `Current State: installed`
### 开启TUN
在 **设置** 中将 **服务模式** 和 **Tun模式** 选项右侧的开关打开即可
### 检查虚拟网卡适配器
打开**`控制面板` > `网络和 Internet` > `网络和共享中心` > 左侧`更改适配器设置`**,找到名称为**`Meta`**且描述为**`Meta Tunnel`**的适配器,如果显示已启用,说明TUN模式成功开启
> 如果你不知道怎么打开控制面板,那就随便打开一个文件夹,把下面这行目录粘贴到文件夹地址栏,然后回车
>
> ```
> 控制面板\网络和 Internet\网络和共享中心
> ```
{% hint style="info" %}
如果clash设置完后没有出现TUN适配器、或开启网络共享之后、适配器消失等情况,尝试重启电脑
{% endhint %}
***
## 热点共享
首先启用[Clash的虚拟网卡](/quest-guide/clash/clash-tun.md)
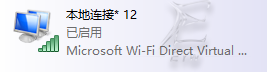
然后开启你的WIFI热点,然后会在你的网络适配器中多出一个**`本地连接* <数字>`**且描述为**`Microsoft Wi-Fi ...`**的适配器,这是你的**`WIFI热点网络适配器`**
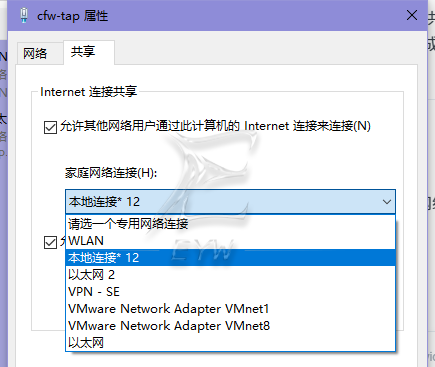
右键**Clash**的**`Meta虚拟网卡`** **>** **`属性`** **>** **`共享`**,勾选**`允许其他网络用户...`**,在下拉菜单中选择之前开启的名称为 **`本地连接* <数字>`** 的**`WIFI热点适配器`**,如果没有下拉菜单,先取消**`允许共享`**,保存关闭之后再回来打开
设置完成,将你的头显连接至你的电脑WIFI热点,即可正常连接网络
> **USB热点**
>
> 如果你用的USB WiFi已经自带了IP,共享时提示改为自动获取,那就打开热点适配器的**属性 > Internet协议版本4 > 改为自动获取**,再进行共享