# Quest激活-NTP解析

## 原理

将Facebook时间服务器地&#x5740;**`time.facebook.com`**&#x89E3;析至国内时间服务器，以获取正确的时间回应，从而解决网络受限的问题

> <mark style="color:yellow;">只是不需要UDP进行NTP校准，但外网还是要连的</mark>
>
> [proxy-server](https://ocguide.eyw015.com/ready/proxy-server "mention")

{% hint style="info" %}
此方法不可用于游戏连网(如VRChat)，如需游戏连网，请使用[虚拟网卡+热点](https://ocguide.eyw015.com/quest-guide/udp-hotspot)

<mark style="color:yellow;">**Quest 3**</mark> 疑似修改了验证地址，首次激活暂不可用，待测试

Quest 3 激活移步 [Netch激活](https://ocguide.eyw015.com/quest-guide/netch)
{% endhint %}

#### 阿里云时间服务器地址

```
203.107.6.88 ntp.aliyun.com
120.25.115.20 ntp1.aliyun.com
```

## 两种修改解析的方案

{% tabs %}
{% tab title="Clash Hosts (推荐)" %}
使用Clash内置DNS解析功能，通过修改配置对NTP域名进行解析

> [路由器](https://github.com/vernesong/OpenClash) 与 [手机端](https://github.com/MetaCubeX/ClashMetaForAndroid) 的 Clash 也可使用此方法
>
> *<mark style="color:red;">**手机用户不会折腾就老实用电脑**</mark>*

在 [Clash Verge](https://ocguide.eyw015.com/quest-guide/clash) 的 <mark style="color:yellow;">**订阅**</mark> 中 **>** 右键 <mark style="color:yellow;">**订阅配置**</mark> **>&#x20;**<mark style="color:yellow;">**编辑文件**</mark>，将下面的代码粘贴进配置文件并保存

> 可<mark style="color:yellow;">**新建**</mark>一份<mark style="color:yellow;">**Local**</mark>配置，将<mark style="color:yellow;">**机场订阅**</mark>的所有内容复制到<mark style="color:yellow;">**Local**</mark>里面再修改，避免订阅更新将已修改的内容覆盖丢失

<div align="left"><figure><img src="https://2866988664-files.gitbook.io/~/files/v0/b/gitbook-x-prod.appspot.com/o/spaces%2F5DDHkFN3wUQNWNPrJmFY%2Fuploads%2Fu3Rbyjxgm7tzYwburUrs%2Fimage.png?alt=media&#x26;token=ef5684ce-9123-410a-89a3-c1b89d1ed841" alt="" width="260"><figcaption></figcaption></figure></div>

使用 <mark style="color:yellow;">**Meta内核**</mark> 需在配置中添加域名嗅探

```yaml
sniffer:
  enable: true
  force-dns-mapping: true
  parse-pure-ip: true
  sniff: {HTTP: {ports: [80, 8080-8880], override-destination: true}, TLS: {ports: [443, 8443]}, QUIC: {ports: [443, 8443]}}
  #个人测试不添加sniff段会导致安卓设备无法正常上网，电脑正常，未深入测试，原因不明
  skip-domain: ['Mijia Cloud']
```

***

### 修改NTP解析

```yaml
hosts:
    'time.facebook.com': 120.25.115.20
```

> 手机端在 <mark style="color:yellow;">**设置**</mark> **>** <mark style="color:yellow;">**覆写**</mark> 添加 <mark style="color:yellow;">**Hosts**</mark> 的 <mark style="color:yellow;">**键 (域名)**</mark> 和 <mark style="color:yellow;">**值 (IP)**</mark>

或者 (<mark style="color:yellow;">**需使用Meta内核**</mark>)

{% code fullWidth="false" %}

```yaml
hosts:
    'time.facebook.com': <你的电脑IP>
ntp:
    enable: true
    write-to-system: false
    server: ntp1.aliyun.com
    port: 123
    interval: 30
```

{% endcode %}

示例：

<div align="left"><figure><img src="https://2866988664-files.gitbook.io/~/files/v0/b/gitbook-x-prod.appspot.com/o/spaces%2F5DDHkFN3wUQNWNPrJmFY%2Fuploads%2FsDPo1CSB5qHYUrxKIwvb%2Fimage.png?alt=media&#x26;token=7820320a-c407-4284-8b15-653164ea6afc" alt="" width="258"><figcaption></figcaption></figure></div>

然后点击右上角的<mark style="color:yellow;">**火焰图标**</mark>(重新激活订阅)

> 旧版本参考内容
>
> ~~如果不生效，尝试将<mark style="color:yellow;">dns</mark>中<mark style="color:yellow;">enhanced-mode</mark>的<mark style="color:red;">fake-ip</mark>改为<mark style="color:red;">redir-host</mark>~~\
> ~~或在dns块中，添加如示例图中最后一行<mark style="color:yellow;">use-hosts: true</mark>~~
> {% endtab %}

{% tab title="路由器Hosts" %}

### 一般市售路由器

{% hint style="info" %}
各品牌路由器设置不一样，需要自行查找修改方法
{% endhint %}

<mark style="color:red;">首先打开路由器的ssh功能</mark>

然后按下电脑上&#x7684;**`Win+R`**&#x952E;，输&#x5165;**`cmd`**&#x6253;开命令提示符

输入以下命令，回车并输入密码，连接至路由器

```
ssh 路由器用户名@路由器IP
```

然后输入以下命令，添加Facebook的时间服务器解析

```
sed -i '$a 120.25.115.20 time.facebook.com' /etc/hosts
```

查看是否修改成功

```
cat /etc/hosts
```

### 软路由

网络设置>DHCP/DNS设置底部>自定义劫持域名>填写<mark style="color:blue;">Facebook NTP域名</mark>与<mark style="color:blue;">阿里云NTP的IP</mark>
{% endtab %}

{% tab title="视频讲解" %}
**视频需要使用梯子(发布在**[**YouTube**](https://youtu.be/5ckX453ODfE)**)**

{% embed url="<https://youtu.be/5ckX453ODfE>" %}
{% endtab %}
{% endtabs %}

## 设置Quest代理

将Facebook的NTP服务器地址修改解析完成后，把<mark style="color:yellow;">Clash 设置</mark>中的<mark style="color:yellow;">**局域网连接**</mark>打开

<div align="left"><figure><img src="https://2866988664-files.gitbook.io/~/files/v0/b/gitbook-x-prod.appspot.com/o/spaces%2F5DDHkFN3wUQNWNPrJmFY%2Fuploads%2Fyth7s3pRXzEZo7r7mIcA%2Fimage.png?alt=media&#x26;token=28d8e145-9950-422a-8123-3d762732f600" alt="" width="563"><figcaption></figcaption></figure></div>

将Quest头显连接至与<mark style="color:yellow;">电脑相同的WiFi路由器</mark>

然后在Quest中，编辑当前连接的WiFi设置

将<mark style="color:yellow;">**代理**</mark>改为<mark style="color:yellow;">**手动**</mark>，把<mark style="color:yellow;">**电脑的IP**</mark>和<mark style="color:yellow;">**端口**</mark>输入进去即可 [#ru-he-cha-kan-she-bei-ip](#ru-he-cha-kan-she-bei-ip "mention")

{% hint style="info" %}
**Clash Verge** 默认端口 <mark style="color:yellow;">**7897**</mark>，**Clash安卓** 默认端口 <mark style="color:yellow;">**7890**</mark>
{% endhint %}

<div align="left"><figure><img src="https://2866988664-files.gitbook.io/~/files/v0/b/gitbook-x-prod.appspot.com/o/spaces%2F5DDHkFN3wUQNWNPrJmFY%2Fuploads%2F9ElGSfpWfEG6VOviHp9V%2Fimage.png?alt=media&#x26;token=62e48a5b-997a-4102-b5a4-75325c2da167" alt="" width="332"><figcaption></figcaption></figure></div>

### 如何查看设备IP

{% tabs %}
{% tab title="Win11" %}
打开系统设置>网络和Internet>网线或WiFi的属性

<div align="left"><figure><img src="https://2866988664-files.gitbook.io/~/files/v0/b/gitbook-x-prod.appspot.com/o/spaces%2F5DDHkFN3wUQNWNPrJmFY%2Fuploads%2FSleeINWGpyfyTY2gdshf%2Fimage.png?alt=media&#x26;token=f2c44012-3c55-421f-89e5-0ceaa82a310e" alt="" width="375"><figcaption></figcaption></figure></div>

拉至最下，找到 <mark style="color:yellow;">**IPv4地址**</mark>

<div align="left"><figure><img src="https://2866988664-files.gitbook.io/~/files/v0/b/gitbook-x-prod.appspot.com/o/spaces%2F5DDHkFN3wUQNWNPrJmFY%2Fuploads%2FeeJwN4Dnyp2M57eNaibn%2Fimage.png?alt=media&#x26;token=5baf26cd-7e7c-4eba-af5d-c5fa536482ba" alt="" width="331"><figcaption></figcaption></figure></div>
{% endtab %}

{% tab title="Win10" %}
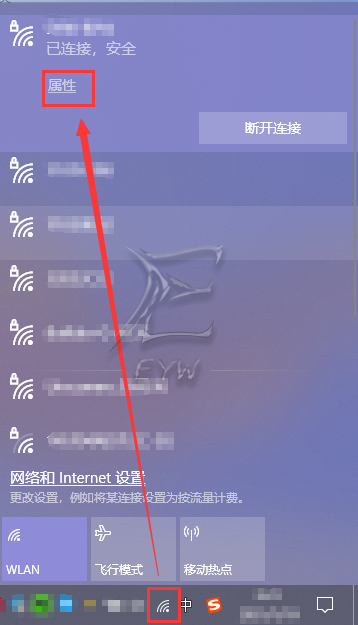
系统托盘查看WiFi属性，或者是有线的属性

<div align="left"><img src="https://fastly.jsdelivr.net/gh/EYW-015/Oculus-guide-China/img/wifi/wifi1.png" alt="" width="188"></div>

拉至最下，找到 <mark style="color:yellow;">**IPv4地址**</mark>

<div align="left"><img src="https://fastly.jsdelivr.net/gh/EYW-015/Oculus-guide-China/img/wifi/wifi2.png" alt="" width="375"></div>
{% endtab %}

{% tab title="安卓" %}
以MIUI示例

打开WiFi设置，点击<mark style="color:yellow;">**右箭头**</mark>查看<mark style="color:yellow;">**更多详情**</mark>

<div align="left"><figure><img src="https://2866988664-files.gitbook.io/~/files/v0/b/gitbook-x-prod.appspot.com/o/spaces%2F5DDHkFN3wUQNWNPrJmFY%2Fuploads%2FG74b4C883vrUgUMGqGQX%2FScreenshot_2024-03-14-16-47-30-885_com.android.se.jpg?alt=media&#x26;token=b0acee94-b57c-4a6a-9367-17ac4f03d084" alt="" width="188"><figcaption></figcaption></figure></div>

在IP地址中寻找<mark style="color:yellow;">**IPv4地址**</mark>

可能会出现很多IPv6地址<mark style="color:yellow;">**一直在滚动**</mark>，等看到了<mark style="color:yellow;">**纯数字格式的IP**</mark>就截图保存

<div align="left"><figure><img src="https://2866988664-files.gitbook.io/~/files/v0/b/gitbook-x-prod.appspot.com/o/spaces%2F5DDHkFN3wUQNWNPrJmFY%2Fuploads%2FmQbobSxK4bhIqDoxDvCf%2FScreenshot_2024-03-14-16-51-10-558_com.android.se1.jpg?alt=media&#x26;token=b6fefe4e-0427-42e0-aaf7-09411f9cfdea" alt="" width="240"><figcaption></figcaption></figure></div>
{% endtab %}
{% endtabs %}

***

#### Oculus请求的DNS地址

*仅是抓包参考地址，*<mark style="color:red;">**不清楚Hosts原理的别改**</mark>

```
connectivitycheck.gstatic.com
time.facebook.com
www.google.com
oculus.com
graph.oculus.com
mqtt-mini.facebook.com
in.appcenter.ms
graph.facebook-hardware.com
graph.facebook.com
```


---

# Agent Instructions: Querying This Documentation

If you need additional information that is not directly available in this page, you can query the documentation dynamically by asking a question.

Perform an HTTP GET request on the current page URL with the `ask` query parameter:

```
GET https://ocguide.eyw015.com/quest-guide/ntp-server.md?ask=<question>
```

The question should be specific, self-contained, and written in natural language.
The response will contain a direct answer to the question and relevant excerpts and sources from the documentation.

Use this mechanism when the answer is not explicitly present in the current page, you need clarification or additional context, or you want to retrieve related documentation sections.
